
TimeLapse Forge
User Guide — Version 1.5.1 September 2026
by Steve Oakley / Practical Illusions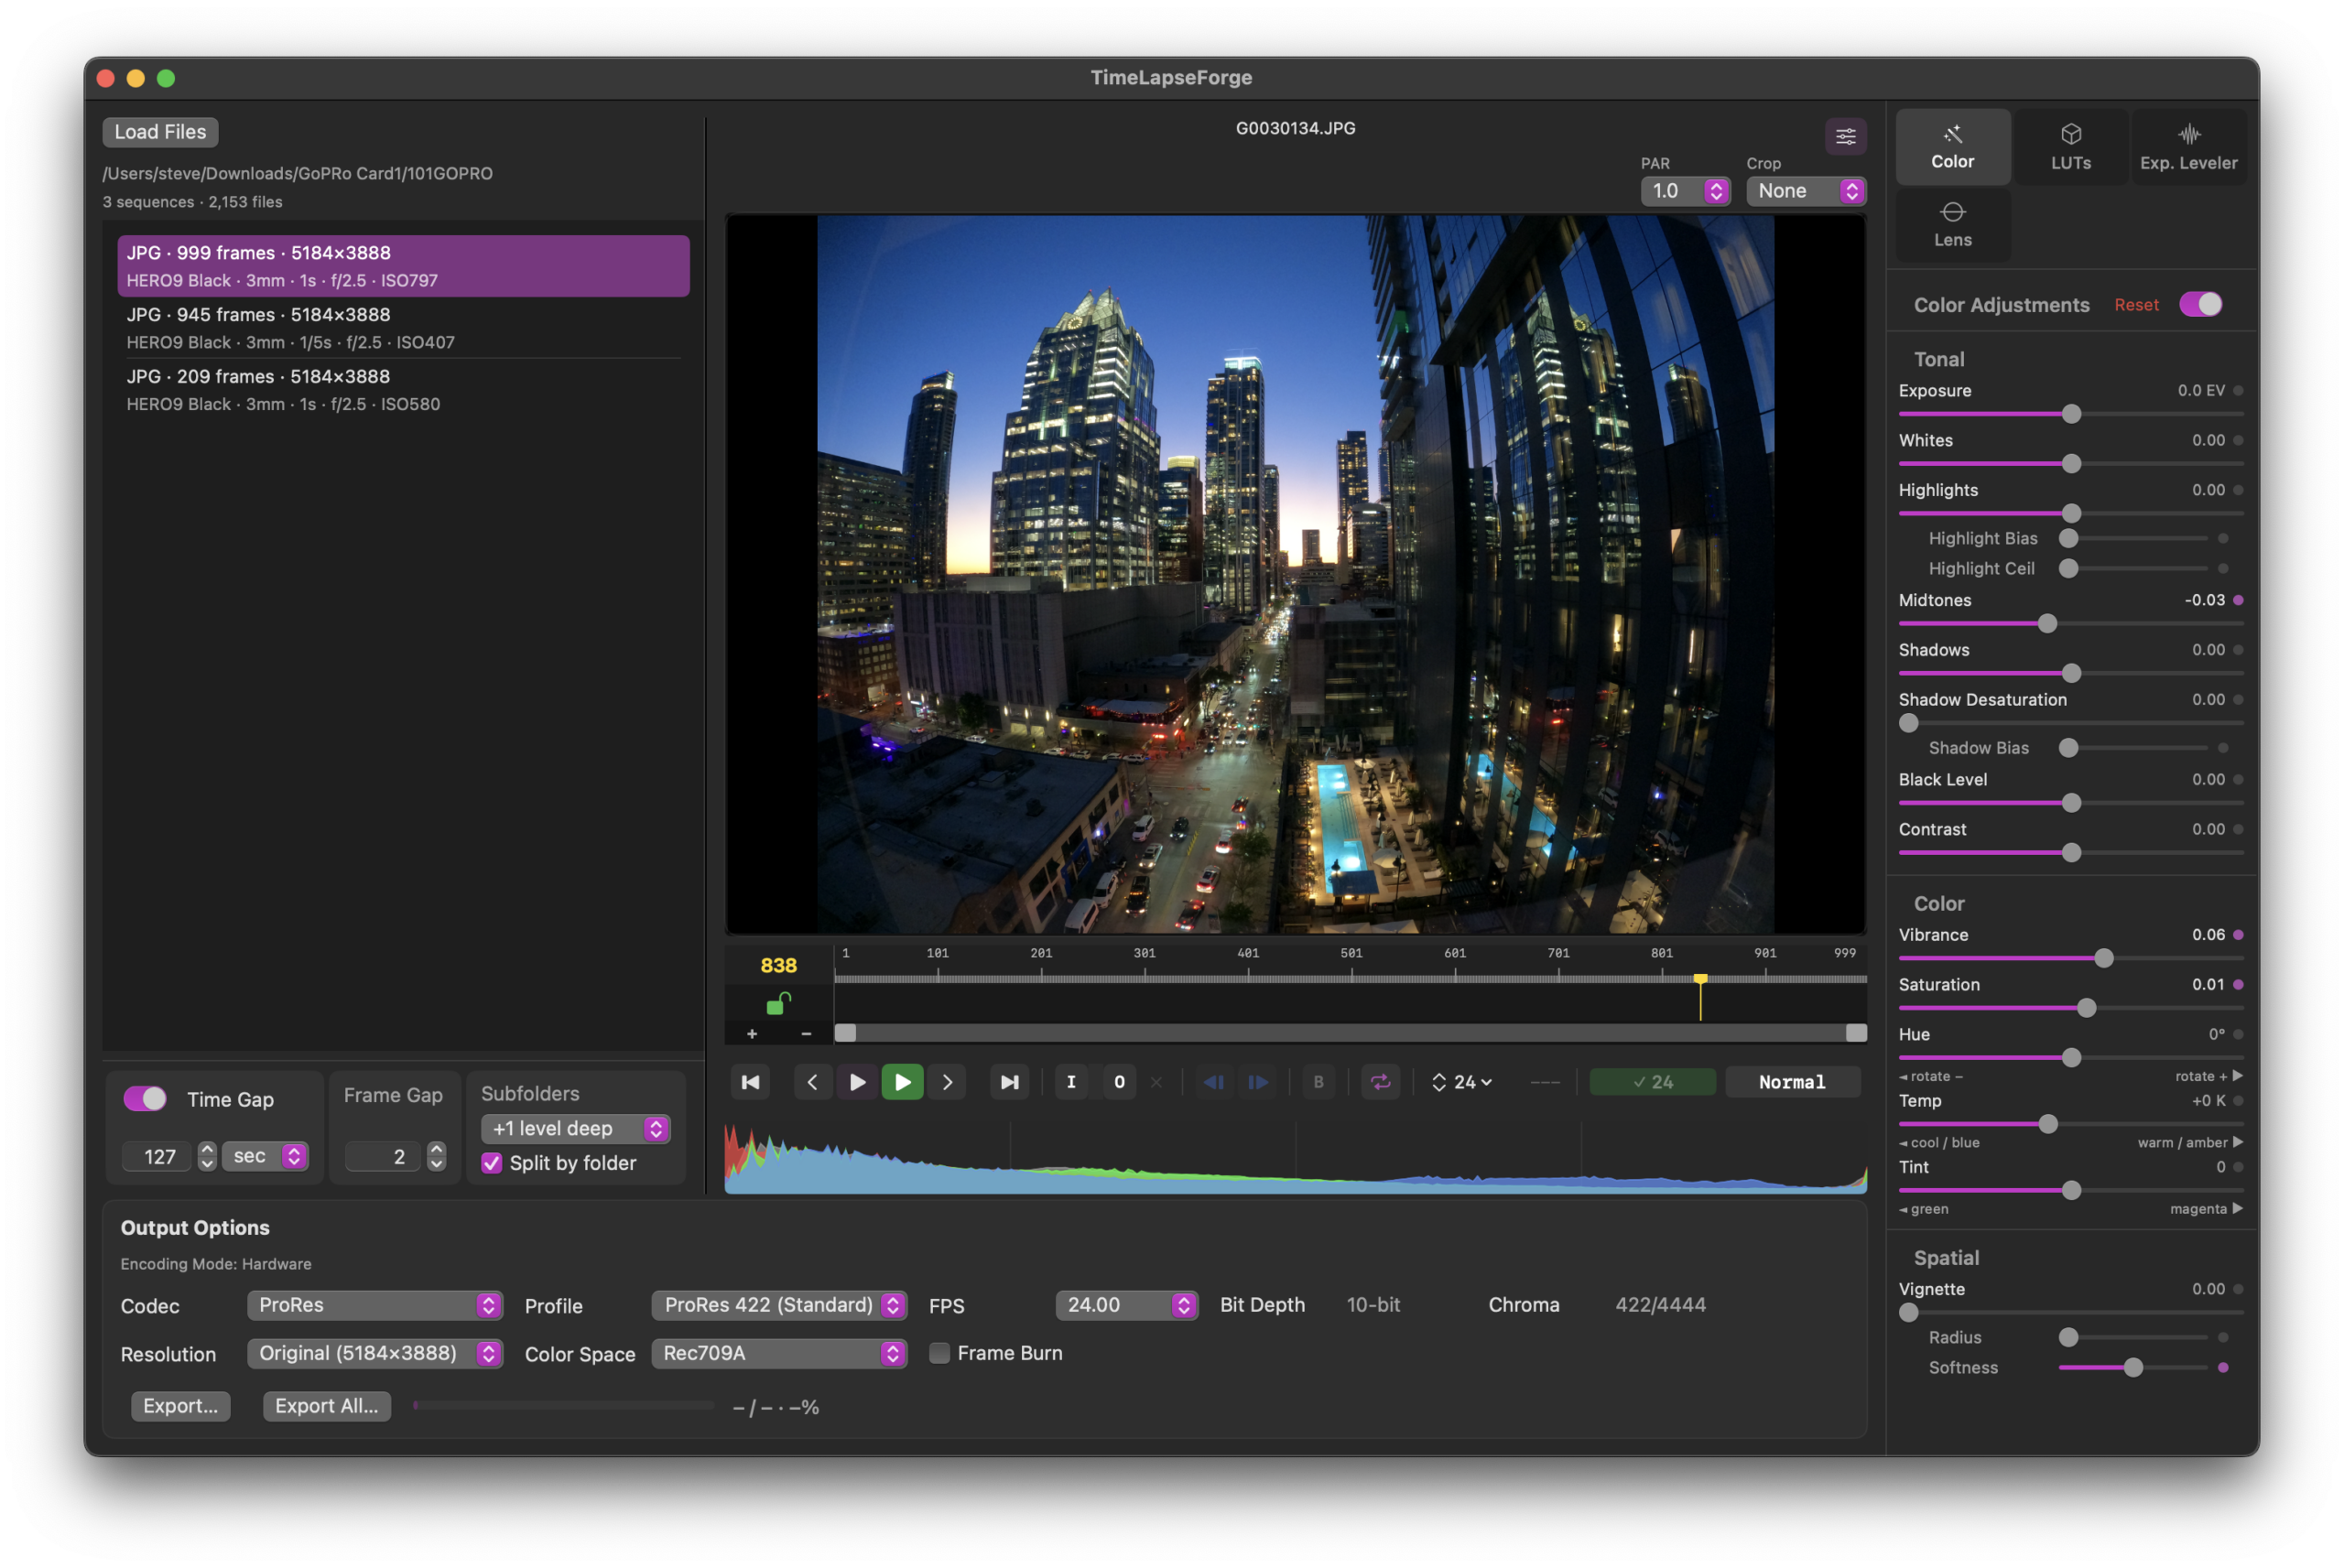
1. Introduction
TimeLapse Forge is a professional tool for converting image sequences into finished motion video. It is designed to eliminate complex, tedious manual workflows and external app dependencies by handling sorting, automatic sequence creation, processing, and export in a single application.
The application is deeply optimized for modern Apple Silicon systems, using multithreaded CPU processing, GPU acceleration, and intelligent resource management that scales to available hardware.
2. System Requirements
• macOS 15 or later
• Apple Silicon M1 or newer required. The more performance CPU cores and GPU cores equals improved performance.
• 16 GB RAM or ideally more highly recommended. 8 GB supported with reduced sequence and performance capacity.
• Fast internal or external SSD storage recommended.
• Any earlier macOS is NOT supported. TLF may run under macOS 14 but thats totally untested.
• Intel machines are unfortunately not supported due to their phase out and lack of future newer OS support.
3. Core Workflow
TimeLapse Forge is built around making the typical time lapse workflow simple and fast — from camera card to finished MOV ready for editing or delivery.
Load images → Preview in real time → Adjustments & Crop → Export
No intermediate mezzanine files like huge uncompressed 16bit TIFFs or external applications such as Lightroom are required. No need to install Python as TLF is a native app.
4. Loading Sequences
You can work directly off camera cards when you need a fast look at what you have. Many cards and readers will support 24fps play. For normal work, copying to an external SSD first is recommended.
You never need to sort files manually into subfolders for any mix of sequences, image formats or cameras.
This includes folders of mixed JPG, HIF, HEIC, DNG and various RAW files. Copy the entire card’s DCIM folder or its subfolders over to your SSD. Even if your camera split sequences across folders of 9,999 images (DCIM spec limitation), or you shot multiple sequences into the same folder, TimeLapse Forge detects and sorts them automatically.
Example :
You started the day shooting a 400 frame JPG sequence. Great start. Then a few hours later you have a new scene to shoot. This time you realize that you should been shooting 10bit HIF images for more correction ability and make that change. You shoot another 300 frames of HIF into the same folder. No worries. Yet a few hours later its near sunset, the exposure seems tricky so you decide to burn card space shooting both RAW and HIF. There goes another 400 frames.
You can then bring that folder of images into TLF and it will generate :
Sequnece 1: 1st set of 400 jpg frames
Sequence 2: HIF 300 frames
Sequence 3: HIF 400 frames
Sequence 4: RAW 400 frames
Since sequence 3 and 4 are duplicates, you can delete the 3rd sequence by selecting it and hitting the DEL key, or using the contextual menu via right mouse button (control) click. This does NOT delete the files from storage, only its listing in TLF.
We have tested folders of 5,000 images where the sort and sequence management is near instant. The app has no technical limit to how many files it works with so don’t be afraid to throw larger numbers of files at it. As example you have a folder filled with thousands of images likely manually sorted by card number, day or date, camera body, etc. Big mess, TLF will zip through it.
4.1 Sorting and Folder Based Workflow
Select a top-level folder containing image files. The app automatically scans:
- Nested folders up to 2 levels deep
Card 1 / DCIM / Folder A
Card 1 / DCIM / Folder B, etc
• Mixed file formats in the same location
• Multiple sequences in one folder detected and sorted
*Sequences with the same file names, extensions, but different cameras !
4.2 Automatic Sequence Detection
TimeLapse Forge groups images into sequences based in part on:
• Filename patterns and file type
• Frame numbering
• Capture time spacing
• Time gaps between frames. This is user adjustable at the bottom of the sequence window, or can be disabled entirely
TLF is about making timelapse’s simple. Between file naming, metadata and adjusting the time gap tolerance to typically 1 or 2 minutes it will keep sequences with short gaps together if thats your intent.
Example – you changed a battery in the middle of a sequence and that took 45 secs. Things are fine because that gap is less than the gap trigger of 2 min for breaking a sequence.
Using a larger gap like 10 minutes will detect normal shooting situations where there are intended breaks. Its where you stopped and then started a new sequence. The Time Gap is always adjustable to try different settings or even turn time gap off. Turning Time Gap off will give TLF “dumb” behavior and make longer sequences matching most other apps.
Did you shoot multiple sequences a few minutes apart but at an interval of 30 secs ? set a lower time gap of say, 120 secs. Thats larger than your actual time between frames and will correctly break the first sequence from the second.
Changed a battery mid-shoot and kept going ? the interval spacing of a shot that should be every 10 or 30 secs is now broken. Adjust the time gap to a larger value to get the sequence to sort correctly without breaking into 2 segments.
TIP : its best to sort your sequences first before doing anything else with adjustments. Adjustments are stored per sequence. If you changing your sequences that will clear those changes if the sequence changes in the sort. There is a warning dialog when this is detected asking if you want to proceed or not.
4.3 Supported Formats
Camera RAW: Canon CR2/CR3, Nikon NEF, Fujifilm RAF ( compressed and uncompressed ), Sony ARW, Pentax, Olympus, Hasselblad, and others.
Standard formats: JPEG, HEIC/HIF 10 bit, TIFF, DNG, PNG, GIF, PDF (JPEG-in-PDF), JPEG 2000 (.jp2, .j2k), OpenEXR (.exr), BMP, PSD, TGA, SGI, PICT.
In the files panel, the format of the images is indicated as part of the sequence name along with basic metadata such as camera, lens, ISO, shutter and aperture if available.
TIP : Camera metadata is read from the first still of a sequence. It will then be written into the exported MOV file of the same sequence. Its handy for tracking that info later if you need it.
Note: DNG written by other applications or cameras may vary in compatibility. Most “standard” DNG files work correctly. However its not guaranteed. If you have a DNG that won’t load, contact us and send it so we can see whats going on.
Canon CR3 notes
Canon has two in-camera settings that make the JPG look brighter than the RAW: Highlight Tone Priority (HTP, the “D+” icon) and Auto Lighting Optimizer (ALO). HTP deliberately underexposes the sensor a stop and lifts it back in the camera’s processing. ALO lifts the darkest tones. Apple’s RAW decoder does neither, so a CR3 opens looking a stop or more darker than the JPG next to it, mostly in the shadows.
TLF reads both settings from the file. HTP is corrected automatically at decode. ALO sets a Toe Lift preset on the Color tab when the sequence loads — Low +0.6, Standard +1.2, Strong +1.8 EV — and shows a note under the slider so you know where the number came from. It’s a normal slider, change it or zero it. The preset only applies to sequences you haven’t adjusted yet, and it can be turned off in Preferences → RAW (12.4).
Fuji DR200 / DR400 gets the same treatment on RAF: the RAW opens at the exposure the camera intended.
5. Sequence Sorting Behaviors
5.1 Missing Frames
Missing or previously deleted frames are handled automatically. In the sequence window you can specify how many frames may be skipped or missing before starting a new sequence. This prevents intentionally deleted bad frames from breaking a sequence into unnecessary pieces. The default value is 1 missing frame.
5.2 Midnight and Date Rollover
Sequences spanning midnight and date change are handled correctly and are not split at the time or date boundary change. Example, shooting a galactic center sequence from 11 PM through 2 AM is one sequence as intended.
9,999 Files Folder Rollover
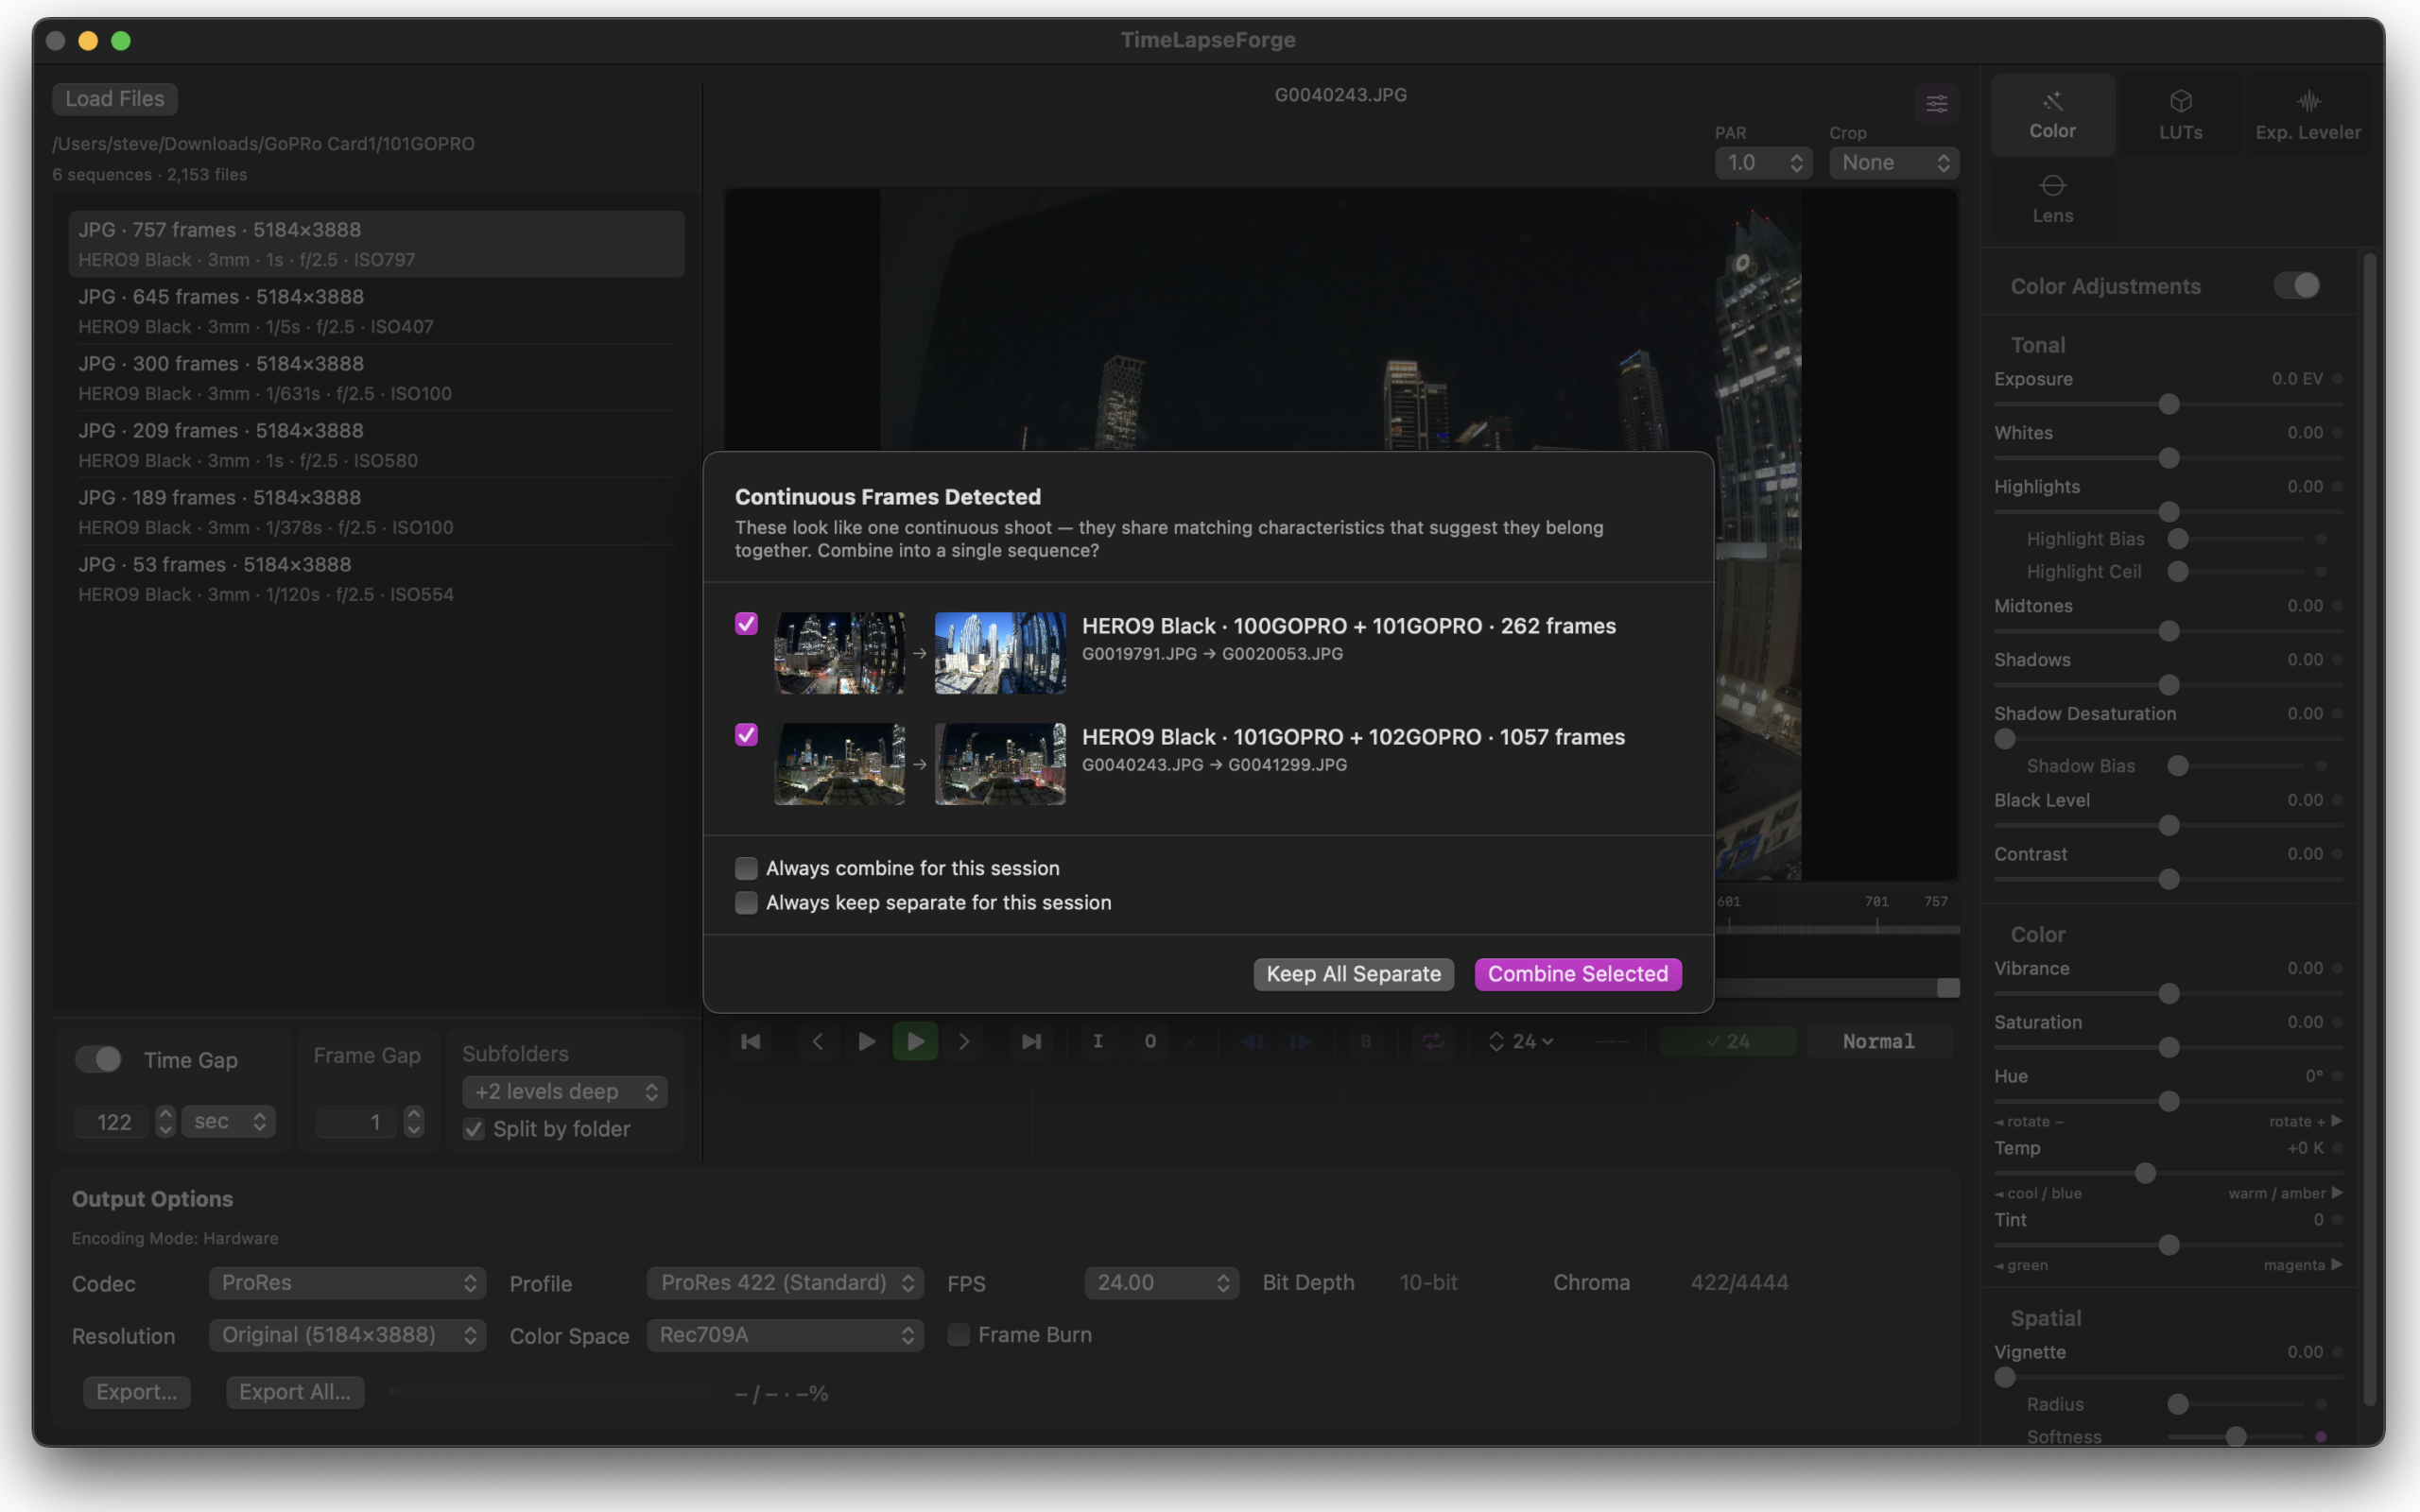
The DCIM spec says you are only supposed to have 9,999 max images in a folder before going into a new folder. This is based on really old specs and operating systems that weren’t happy with more files than that in a folder. We live with this spec even though it’s not a problem for modern OSs. Note that because the camera, with card changes, folder changes, could roll over at any file name like frame_23,456 if the folder its writing to hits the 9,999 folder limit. No problem, it’s handled.
There is also another odd case due to the DCIM spec : no frame 0’s. techincaly its reservered for “special data” but in reality its an image the camera willl skip writing. So expect 9,999 -> New Folder -> Frame 1, skipping frame 0. TLF has special logic to correctly handle this as you’d expect.
When TLF detects one of these situations, it will put up a dialog box showing the frames, and ask do you want to merge or keep the detected sequences separated. You can save your preference with the “remember my choice” check box if this pops up often. This setting is per session and can be reset in preferences.
5.3 Nested Folders
Multiple sequences across subfolders are detected and loaded together. Each sequence is organized independently. You can select if folders are intended as their own sequence do to previous manual sorting, or if there are continuations between folders because the camera created a new folder during shoot.
6. Playback and Review
Sequences can be previewed at standard frame rates directly in the app. Playback frame rate is set in the timeline transport bar via the menu. Right next to it is a FPS indicator.
Playback reflects current processing settings, allowing real-time evaluation without exporting.
The green cache bar in the timeline shows how many frames are held in RAM. With fast storage and JPEG sequences, playback often works smoothly even beyond the cached region. For processor-intensive formats like RAW, staying within the cached region gives the most accurate playback with adjustments.
Reducing the frame rate to 12fps or 6 fps can yield smoother playback on longer sequences of RAW images with fast storage and lots of cores.
How Realtime is TLF ?
Lets set expectations here. For now, 40MP RAW is not going to be realtime. It will require caching for RT playback in 2026. TLF decides if a format can be played in RT or has to be cached. The frames cache size can be adjusted in prefs depending on your machines actual RAM and if you want to use other apps at the same time.
On a machine wtih 8gb of RAM it’s not going to be a big RAM cache, so performance will be limited. You may find that you need to quit other apps to free up enough RAM for large enough cache. JPG’s will probably play back in RT, but don’t expect long cache playback of RAW or DNG files. An 8GB machine just won’t be happiness for large processor intense images.
With 16gb of RAM things start working well for longer sequences. 24gb is better. 32+GB will be great as long as as you don’t have a lot of other apps also open at the same time using a lot of RAM.
More Performance CPU cores equals the best level of decode and playback. E cores are lower performing but save power. TLF has some optimizations to request performance cores, but the OS may not initially allocate them. After the app runs a couple times the OS tracks the CPU load and will then more often give TLF performance cores.
Either way, more cores is more cores. On an older but still quite great M1 Ultra CPU TLF will decode 12-16 RAW frames in parallel. Its a fine sight to see. Its a great bump in speed having all those performance cores.
The use of cores is adjustable in prefs depending on if you want to do other work, or dedicate the time to TLF and processing your images quickly.
So what about the real time playback again ?
JPG and HIF are the two most common lightweight formats cameras shoot. Our testing has shown this as a base starting point :
M4 : 5K GoPro jpg = 30FPS, 6K X 4K XH2s ( 26MP ) 24-27 fps, HIF 6K 15-22 FPS -> Cache
M1 Max : 5K GoPro jpg = 30FPS, 6K X 4K ( 26MP ) 24-27 fps
M1 Ultra : Plays 6K Fuji RAW 6fps from SSD ! cache loads quickly. All those cores count. Despite being the oldest machine in the collection it continues to impress and keep up with newer machines.
Note that playing off the internal system SSD was slightly slower than using an external USB C SSD rated at 1,000MB/sec. Best guess is that other apps and OS processes made the needed I/O harder to sustain.
6.1 In and Out Points and the Cache
Set In and Out (I / O keys, or the transport buttons) around the section you actually want and the frame cache only fills that section. On a 900 frame 7K RAW sequence that’s the difference between waiting for the whole thing and starting to grade in seconds. Move the In point while the cache is still filling and it drops what it was doing and starts on the new range. Scrubbing outside In / Out still decodes the frame under the playhead so you can look, it just doesn’t fill around it. Clear In / Out and it goes back to caching the whole sequence.
6.2 Full Screen Playback
⌘F, or the expand button above the preview. Sidebar, panels and output options drop away leaving the image, timeline and transport. All your corrections are live. ⌘F or Esc to come back, everything is where you left it.
6.3 1:1 Pixel View
Z, the 1:1 button above the preview, or double-click the image. This reads the ORIGINAL file at full resolution, not the preview cache, so what you see is what will export. Use it to judge focus, star shape, noise, and the Haze Notch selection at the pixel level. Drag or scroll to pan. Double-click punches in at that spot, Z centers. Shift-Z or Esc goes back to fit. 1:1 is for paused frames and stepping — starting playback returns to fit.
6.4 Keyboard Commands
Space Normal Play / Stop. Loads cache as needed, will play lighter formats in real time directly from storage when possible
Space + Shift : Start / stop play of cached frames only, looping on by default.
Left / Right arrow Move one frame
[ Sets In Point
] Sets Out Point
I Set In point
O Set Out point
Option + I Clear In point
Option + O Clear Out point
Shift + I Goto In
Shift + O Goto Out
X or Option X Clear Both In and Out
B Toggle Blend repair current frame (Deflicker panel) on or off
+ or = Zoom timeline in
– Zoom timeline out
0 Reset timeline zoom
⌘F Full screen playback on / off
Z 1:1 pixel view on / off (centered)
Shift + Z Back to fit
Esc Exit 1:1, or exit full screen
Double-click image 1:1 at that point
⌘C / ⌘V In the sequence list, copy / paste adjustments between sequences
6.5 Contextual Menus
In the files / sequence window, copy and paste adjustment settings between sequences. When pasting attributes a dialog will open to ask what settings to apply. Only settings which have been changed will have a selected check box.
6.6 PAR — Pixel Aspect Ratio
Located above the preview image area. The PAR control adjusts the display aspect ratio for sequences shot with anamorphic lenses. Common values are 1.0 (standard square pixel), 1.25, 1.33, 1.5, and 2.0.
This is a display and export transform. Source files are not modified.
Crop To Aspect Ratio
Located above the preview image area. Crop provides common image frame ratios from 4:3, 16:9 through 2.35:1 and vertical video formats.
When enabled the crop box is drawn to show the area of the image to be used. In wide formats the Y position is adjustable, in tall formats the X is adustable. The crop always uses the max width or height as appropriate.
Crop interacts with final output !
If the crop and output aspect ratio match, then you will get a full image output with no letterbox.
If crop and output resolution don’t match aspect ratios TimeLapse Forge picks the intelligent best predictable output option. Examples :
When NO crop is applied, selecting Native in the output resolution will create output mov of the same size and aspect as original image.
When no crop is applied, you select an output resolution aspect ratio thats different than the original. If the width of the output is shorter in height, then the output is a center cut out of the original image using its full width, cutting off the top and bottom of the original. In a vertical format output, the full height of the image is used and the image is center cut. The output resolution and aspect determines actual image.
Your source is 4:3 action camera in 5K X 3.5K, you select 16:9 as your crop and position the box. On output you select 1920X1080 or 3860X2160 which are also 16:9 formats. Output fills the frame with no black edges.
Your source is the same 4:3 action camera in 5K X 3.5K, you select 2.39 as your crop and position it. On output you select 3860X2140 which is 16:9. The output top and bottom letter boxes the 2.39 image into the UHD frame.
What if you wanted to just have a 4K wide and native height image with no letterbox ? Select the 4K DCI 2.39:1 preset , or use custom output size to manually enter appropriate values.
Your source is the same 4:3 action camera in 5K X 3.5K, and you select 9:16 vertical format as the crop. On output you can select custom and 1080W X 1920H to get a full frame image with no black edges.
TimeLapse Forge does its best to produce reasonable expected results when things don’t match.
7. Image Adjustments
7.1 Color Controls
The Color tab has a master switch at the top. Off shows the original image with all corrections bypassed, without losing your settings. Reset puts everything back to zero. Every control has a small dot on the right — click it to reset just that control.
Adjustments are applied in linear light, in a fixed order, the same way in preview and export. They are stored per sequence.
Tone
• Exposure — overall brightness in EV (stops).
• Whites — the very top of the range, the last stop before clipping.
• Highlights — bright tones. Highlight Bias narrows or widens which bright tones it affects: left is broad, right is only the very brightest. Highlight Ceil protects near-clipping pixels from being pulled down — slide right to leave the brightest pixels alone.
• Midtones — the middle of the range, a gamma style control.
• Shadows — dark tones. Shadow Bias works like Highlight Bias: left is only the very deepest shadows, right is all dark tones.
• Shadow Desaturation — removes color from the shadow zone only. Useful for color casts in the darks, IR contamination, and cameras that oversaturate shadows.
• Toe Lift — lifts the deepest near-black tones, full strength at black and tapering off up through the shadows. Unlike Black Level it opens up separation in the toe rather than adding a flat pedestal. This is the tool for RAW files where the shadow detail is there but hiding — Canon HTP and ALO files especially. A small matching desaturation is built in, because near-black color at big lifts is mostly noise and reads as garish.
• Toe Desaturation — trims that built-in desaturation. Right brings the color back, left goes more neutral.
• Black Level — a flat lift or push of black. The “milky” or “crushed” control.
• Contrast
Color
• Vibrance — saturation that favors the less saturated colors and protects what is already saturated.
• Saturation
• Hue — rotates all colors.
• Temp — warm / amber to the left, cool / blue to the right.
• Tint — magenta to the left, green to the right.
Copy and paste. Right-click a sequence in the files list (or ⌘C / ⌘V) to copy its adjustments and paste them onto another. A dialog asks which groups to paste.
7.2 LUT Support
Up to two LUTs can be applied simultaneously and are processed in real time.
If Davinci Resolve is installed, its LUT folders are automatically detected — you don’t need to duplicate files you’ve already installed.
TimeLapse Forge also has its own user LUT folder (path visible in Preferences) plus a fourth user-configurable path pointing anywhere on your system.
7.3 Haze Notch
Haze Notch is a color EQ for the sky. It cuts a narrow band of hue — the sodium orange or brown of light pollution, the green of airglow — while the stars, the foreground and everything else keep their color. It can also do the opposite and boost a band, deepen a daytime sky blue, or rotate an ugly color toward a better one.
It is on the Color tab under the color controls, with a master switch at the top of the section. Two independent bands, each with its own on / off. Band 1 defaults to 40°, about where sodium streetlight glow sits. Band 2 defaults to 130°, airglow green.
Picking the color
Click the eyedropper next to the band’s color swatch, then click the color in the preview. As you move over the image the swatch and a small circle next to the cursor show the exact color under the mouse, so you know what you are about to grab. The click sets the band’s Color and tightens the selection to that pick. Click the eyedropper again to cancel.
Selection — what the band grabs.
• Use Mask — on, the band only affects its color selection. Off, no selection at all: the correction below applies to the whole frame, which is how you would use it as a gentle overall filter.
• Color — hue center of the band in degrees.
• Width — how many degrees of hue the band covers.
• Feather — softness of the band edges. Left is a hard cutoff, right fades gradually.
• Keyed Selection — on, the band targets the picked value using the qualifiers below. Off, it is a plain optical style filter: the whole hue band, any saturation, any brightness. Some shots key well, others just want the simple filter.
• Sat Range — left, only colors as saturated (or as pale) as the pick. Right, any saturation within the band. Needs a pick.
• Luma Low / Luma High — brightness floor and ceiling. Tones darker than Low or brighter than High are left alone. Luma Soft softens both edges.
• Grow — expands the selection to pick up pixels that just missed it. This is the cure for bright noise speckles left inside a darkened area. A small cleanup runs even at 0.
• Smoothing — softens the selection edges after Grow. Preview and export use the same smoothing.
Show Selection at the top of the section shows what the bands are selecting as a grayscale matte — white is full strength, gray is the falloff. The matte button next to each band’s eyedropper shows just that band. The effect itself is paused while a matte is showing. Check the selection at 1:1 (Z) — the fit view averages things out.
Change Color — what happens to the grab.
• Saturation — negative pulls the banded color toward neutral (−1 is a full desaturate, −2 pushes it out to the band edges). Positive boosts it.
• Hue Shift — rotates the banded color toward a better hue instead of removing it. Sodium orange toward amber, muddy sky toward clean blue.
• Darken — treats the glow as added light and subtracts it. Bright highlights are protected.
A typical night sky: pick the sky glow with the eyedropper, Show Selection to confirm it grabbed the sky and not the tree line, add Grow if the sky looks speckled, then Darken until the glow is gone and pull Saturation down a bit for what is left. The reset arrow on each band puts it back to defaults without turning it off.
7.4 Stylize
Vignette darkens toward the edges. Radius sets where it starts, Softness how gradual it is. Applied last, after everything else.
7.5 Lens Correction
The Lens tab straightens barrel and pincushion distortion. It is done before color and everything else, so the grade sees the corrected geometry.
• Strength — negative is barrel correction (center fixed, edges pulled in): GoPro, fisheye, wide angles. Positive is edge-pinned expansion for pincushion.
• Radius — how far from the optical center the correction is fully applied, as a fraction of the shorter image dimension. 0.75 works for most lenses.
• Center X / Y — the optical center. 0.5 is dead center, move it if the warp is asymmetric.
Settings are remembered per camera and lens. Load another sequence shot on the same lens and TLF offers to apply them. If the lens changed it still offers, with a note to check the result.
8. Exposure Leveler™
Exposure Leveler reduces exposure variations between individual frames and larger groups of frames. This uneven brightness that causes a flickering effect when a sequence is played back as video. It’s a sophisticated tool using multizone exposure meter like your camera, but smarter. It also does more complex exposure adjustments. Instead of doing a simple overall gain adjustment, its actually does a shadows, midtowns and highlights adjustment to only the areas that needs it ! All automatically but with manual overrides and adjustments per frame if you need it.
Typical causes of flicker:
• Lens iris not stopping down consistently between frames.
• Changing lighting conditions like artificial lights, clouds partially covering the sun for a few frames.
• Inconsistent shutter or auto ISO variations
• Manually adjusting exposure during sequence to compensate for changing light. Try not to do that !
Exposure Leveler will find individual frames first that exceed the exposure variation threshold set in the interface and adjust them. It will then expand out into leveling nearby frames and groups of frames. All automatically with user controls to adjust how much it adjusts.
Exposure Leveler is non-destructive. The correction is previewed in real time and never modifies source files.
8.1 Exposure Leveler™ Workflow
1. Select a sequence and switch to the Exposure Leveler™ panel
2. Play and see what sort of flicker you have. Is it random frames ? Pick Standard. Is it frequent flicker like from LED lights ? Pick Continuous. This gives Exposure Leveler the hint it needs for better fix. Then click Analyze which measures the luminance of every frame using GPU-accelerated metering tool. The “exposure meter” is intelligent and not thrown off by moving bright spots like the sun or car headlights moving through a shot.
TIP : if you have a case where the normal exposure meter fails, or you want to really isolate to a specific area it reads, there is a sample area tool. Its sometimes useful to isolate just the sky for some situations, letting the ground go where it may and not throw off the sky.
Click the Sample Area button
Draw a box on the image, adjust it if needed
Click Done
Analyze will indicate it needs to Recalculate and will use just that area.
When you draw a sample area over a very dark part of the scene (night sky, deep shadow), the meter may report little or no flicker even when you can see it. Two things are working as intended: (1) very dark regions sit near the measurement’s noise floor, where readings aren’t reliable, and (2) the meter deliberately ignores small bright outliers like passing headlights, a streetlight, a bright star so they don’t skew the correction. If you want a dark region measured, apply a black-level or shadow lift before analyzing so the area reads above the noise floor.
3. The app displays a luminance graph and marks flagged frames on the timeline in blue
4. Review and adjust settings if needed, then click Recalculate to update. Its very fast as all the heavy measurement work is already done and saved.
5. The correction is applied in real time during playback and export
Analysis results are stored per sequence. Switching away to another sequence and back preserves the work.
If you do something that causes the sequences to be sorted differently like adjusting Time Gap, analysis is lost. There is a dialog that will open up to confirm the sequence changes. Try to sort your sequences first.
8.2 Analysis Controls
Pick which mode to analyze in first.
- Standard : looks for typical random frames or groups of frames of variation frequently found in sequences.
- Continuous : looks for high frequency variations typical of LED lights. It levels every frame to the average trend at your Smooth Window width. Widening the Smooth Window flattens harder, and the average still tracks slow lighting trends (sunset, clouds) instead of hard flattening them. Frames already on the trend stay clean.
- Continuous bypasses the outlier passes, alternating frame detection, and groups of frames as those all assume clean reference frames, which a high frequency flickering clip doesn’t have.
- Max Correction still applies which limits how far any frame gets pushed.
Smooth Window — how many frames on either side to consider when determining the expected exposure at each frame. Smaller values (1–3 frames) are tighter and more responsive to rapid change. Larger values produce a smoother reference curve. A short frame measurement is good for single or small groups of frames that are off. When looking for longer corrections you can try increasing this.
Variation Threshold — how far a frame’s exposure must deviate (in EV = F stops) before being flagged for correction. At 0.020 EV the default, only frames that differ meaningfully from their neighbors are marked. Raising this value reduces sensitivity. A good starting point for sequences with more subtle variation is 0.02–0.05 EV.
Max Correction — limits the maximum correction applied in stops. When a flagged frame has a large deviation, this prevents over-correction that can make a frame look obviously different. Start with Unlimited and reduce if corrections look too heavy. If the correction amount just doesn’t work for a particular frame then look at the blend frame feature to fix problematic frames outside of a reasonable correction range.
When To Use The Rectangle To Limit Measurement Area
A dark warning triggers when >60% of the image pixels are below 22% perceptual brightness across >50% of frames. This represents a genuinely near-black frame or very dark series of images, not just dim scenes
Bright warning triggers when >60% of the image pixels are above 93% perceptual — effectively only white backgrounds or overexposed skies near clipping.
8.3 Correction Modes
Frame-by-Frame
Each flagged frame is independently corrected to match its immediate neighbors. The target exposure is the average of the frame immediately before and the frame immediately after, calculated in linear light. This is the choice for random single frames.
Group Smoothing
Designed for groups of consecutive frames that are all off in relation to the rest of the sequence. Instead of correcting each frame independently, they are treated as a group. The last frame before the group and the clean frame after it become target points. Each frame in the group receives a correction that interpolates smoothly between those two end points producing a natural looking transition rather than a flat correction. This should handle gradual changes of overall light levels that happen when shooting day to night, the full monty of timelapse shooting.
The Max group size slider controls the longest run of frames treated this way. Runs longer than this fall back to Frame-by-Frame.
Tip: Use the sequence In and Out points to exclude genuinely unusable frames at the start or end of a sequence. Exposure Leveler cannot reliably correct frames that have no well exposed neighbors on one side.
8.4 The Luminance Graph
The graph shows raw frame luminance and the smooth reference curve the algorithm uses. Flagged frames appear as coloured markers on the graph. The current frame’s EV offset is shown alongside — positive if the frame is brighter than expected, negative if darker.
The app also reports the general character of variation detected:
• Flickery — random frame-to-frame variation. Frame-by-Frame correction recommended.
• Ramped — gradual brightness shift across the sequence.
8.5 Fine Adjust Frame
Exposure Leveler™ is pretty good, but not perfect and we are working on making it better. Sometimes its automatic correction is a little off. These controls provide manual override of an individual frame. Exposure adjust the entire image but is also the widest ranging adjustment. A little goes a long way, but often use the controls for specific ranges will work better.
Dark shots may benefit from adjustment in the toe or shadows. Toe is the very lowest shadow area just above black. In particular adding contrast and saturation can really help when boosting dark shots. Likewise bring the shadow control up a bit is also beneficial.
If you have 2 or 3 frames in a row that could use the same correction, or event far apart, note the Copy and Paste buttons in the top left of this area. Once you dial a correction in, Copy, then paste it to other frames that may need the same adjustment.
A purple dot on the Correction Strength header indicates the current frame has custom zone settings.
TIP : a manual correction doesn’t have to be 100% perfect match to its neighbors. getting 90-95% close is often more than good enough once you play the frame in context of everything. Always play your adjustment as you’ll gain the judgment of how close you really need to be.
8.6 Manual Individual Frame Repair
When a frame is too far off to correct cleanly, or is genuinely unusable due to motion blur, vibration, camera bump, etc it can be repaired by deleting and blending with adjacent frames. This is a non-destructive operation and can be toggled on or off to see how the fix works.
Enable Frame Blending in the Frame Repair section. Navigate to the bad frame and press B or the B button in the transport bar area. The frame is removed from display non-destructively and replaced with a blend of the surrounding frames.
Blend modes:
• Blend 1 frame — dissolve between the immediately adjacent frames
• Blend 2 frames — blend across a wider neighbourhood
• Optical Flow 1 or 2 frames — motion-aware interpolation between neighbours. Better for sequences with camera movement such as slider move, pan, rotation. It takes slightly longer to compute the frame but does run on the GPU.
Playing the sequence is the best way to judge which blend mode works for a given shot.
Auto-Repair Of Bad Frames
When a frame is too far off to correct : a black frame, a corrupt frame, or a massive exposure spike, the Exposure Leveler doesn’t try to correct it. Trying to correct a frame that extreme would look worse than the problem. Instead the frame is repaired by rebuilding it from its neighbors.
Frames that need repair are marked automatically during analysis (any frame whose required correction exceeds your Max Correction limit). Each marked frame gets a repair method you can change per frame.
Repair methods
- Blend (default). Dissolves the neighbouring clean frames together to fill the gap. Fast, and the safest choice for static or low motion shots.
- Optical Flow. Synthesises the missing frame by tracking motion between neighbours. Best when the camera or subject is moving, so a straight blend would ghost or smear.
- Remove. Drops the frame entirely from the export.
Per-frame, not global. The method is set on each frame individually. Changing one marked frame to Optical Flow does not change the others; a newly marked frame still starts on Blend. This is intentional: the right method depends on the shot, and often on the individual frame.
“Low motion” (orange). When you set a frame to Optical Flow and it reports low motion in orange, the scene isn’t moving enough between neighbours for flow to help. On a near static frame, Blend and Optical Flow produce nearly the same result, so Blend is the better pick there.
Playback. Repair frames play back using their repaired version, not the original bad frame. During playback, Optical Flow frames preview as Blend for speed; park on the frame to see the true Optical Flow result.
Which to use
- Static / locked off / low motion → Blend
- Camera move, moving subject, panning → Optical Flow
- Frame you never want in the output → Remove
There’s no single correct choice; it depends on the shot. Blend is the safe default; switch to Optical Flow when motion would make a blend ghost.
9. Motion Smoothing
Motion Smoothing blends each frame with its neighbors — a longer effective shutter for smoother water, clouds and traffic when the capture interval was long and the shutter short. Best on locked-off shots. It is on the Motion tab.
• Strength — 0 is off, 100% is a full average of the window.
• Window — 3 or 5 frames.
It runs after all corrections (leveler, color, LUTs) and blends in linear light, in preview, playback and export. Playback FPS may dip while it is on, and exports run slower because the neighbor frames have to be decoded too.
10. Exposure Ramping
For sequences that span a large change in ambient light like dawn to dusk, shooting into the night, the exposure drift is gradual and intentional rather than random frame-to-frame error. Exposure Leveler as a V 1.0 may handle this well, but we are still testing examples. Try it, let us know how it works.
Many modern cameras include an Exposure Smoothing option in the interval timer settings. When at least one exposure parameter is set to Auto, the camera adjusts exposure gradually between frames as smoothly as possible. Nikon Z series cameras have an effective implementation. Newer Fujifilm X-series bodies also include this feature. We highly recomend using this feature to help smooth out the exposure in camera as much as possible.
11. Export
11.1 Supported Codecs
• ProRes — Apple ProRes 422, 422 HQ, 4444. Recommended for editing workflows.
• H.264 — Broad compatibility, smaller file sizes. Good for delivery and web. 4:2:0, 4:2:2 8 and 10 bit options available.
• H.265 / HEVC — Higher compression efficiency at comparable quality.
- All hardware accelerated when possible depending on settings. Later model M2+ series processors have expanded capabilities like 4:2:2 support vs 4:2:0 on M1.
TIP : Need MXF ? Rewrap MOV→MXF after export. Use ffmpeg -i output.mov -c copy output.mxf which rewraps ProRes from MOV to MXF Op1a with no re-encode. This takes seconds to do. The codec data is identical. There are commercial apps that can also do this.
11.2 Bit Depth and Chroma
• 8-bit and 10-bit output (codec dependent)
• 4:2:0, 4:2:2, 4:4:4 chroma subsampling (codec dependent)
11.3 Resolution
• Original frame size
• Standard presets: 4K UHD, QHD, 1080p
• Custom width and height
11.4 Frame Rates
23.976, 24.00, 25.00, 29.97, 30.00
11.5 Hardware Encoding
When available, hardware encoding is used automatically for faster export with lower CPU load. This is CPU model dependent. The app intelligently reads the hardware resources available at startup and sets it self up accordingly.
12. Preferences
12.1 Performance Modes
TimeLapse Forge includes three performance presets to balance speed against system resource usage:
• Low — leaves more headroom for other applications running alongside
• Medium — balanced, good default for most workflows
• Max — full system utilization; fastest processing, best used when the app has priority and you need it done ASAP.
These settings control RAM allocation, CPU threading, and decode throughput. Higher settings require more available RAM and work best on M1 Pro/Max/Ultra or M2+ systems.
12.2 Export
Set a default export folder so the save dialog opens where you want it every time.
12.3 Sequence Detection
Camera rollover detection — when a shoot spans a card’s DCIM folder rollover (9999 → 0001) or a date change, TLF finds the pieces and asks whether to combine them. You can answer each time, or have it always combine or always keep separate for the session.
12.4 RAW
Match Canon Auto Lighting Optimizer — on by default. Presets Toe Lift on load for Canon files shot with ALO so the RAW matches the camera’s JPG in the shadows (see 4.3). Turning it off clears the preset from sequences you have not touched. Sequences you have adjusted are left alone.
12.5 LUT Folders
See 7.2.
13. Updates
Direct / website version: TLF checks for updates itself. TimeLapse Forge menu → Check for Updates, or wait for the prompt. Updates download and install in place.
App Store version: updates come through the Mac App Store like any other app.
Both versions are the same app with the same features.
14.
TimeLapse Forge is developed by Practical Illusions LLC. timelapseforge.com